The Windows Cookbook
1. Download and installing MinGW
- ! If you are going to be downloading Dev-Cpp, skip this section!
- Download the MinGW installer.
- Run the MinGW-5.1.3.exe.
- You should read "Welcome to MinGW Version 5.1.3, click next.
- You should now see the GPL license, click "I agree".
- Select all of the options listed in the components window except "MinGW Make". You may be able to get away without selecting a few, but
I don't know which.
- Click next to install
- Click finish to complete the installation, you now have a working GNU compiler
2. Download and installing DevCPP (Optional)
DigiBand has dev-cpp project file, you can use it to edit DigiBand in Dev-CPP. However
we currently do not maintain the file for compiling. You will need to be knowledgable about
Dev-CPP and how IDE's in general work to configure the project. You will also want to read
the last section, "Understanding the DigiBand code tree structure".
- Download the Dev-cpp installer with MinGW
- run and follow the installer until you reach the point where it asks what you like installed with MinGW.
- Check all but "MinGW Make" and then continue to follow the installer.
- When the installation process finishes you should be ready to compile programs with Dev-CPP.
- Download the MSYS installer.
- Run the installer, you should read, "This will install "Minimal SYStem". Do you wish to continue?" click yes, then next.
- Now you should see the GPL License for MSYS. Please read this then click yes to continue.
- You should see the change log. This is possibly irrelevant as this would be your first time seeing this, click next.
- Select the directory you would like to install MSYS in. For this example you may wish to leave it default, click next.
- You should see "Select components". The only option I've seen is installation for i386 based computers, so just click next.
- Now choose the start menu folder you want to install MinGW in, then click next, then install.
- After you install, you will be asked if you want to run some post install scripts. Type Y then enter, you will want these installed
so you have a working posix environment for compiling certain tools.
- Finally, choose whether or not if you wish to view the MSYS welcome doc and readme, then click finish.
4. Download and installing SDL
You can download SDL from their website and install it as a binary, but we recommend compiling it
with a few options enabled and disabled.
Using the binary SDL:
- Download the SDL mingw binary
- Extract this file into your /mingw/ directory. By default this is located at C:\mingw\.
To do this you have multiple options. But we'll cover how to do this with tar.
Extracting with mingw tar:
- Copy the tar.gz into your mingw directory.
- Click start, click run, type cmd, hit return, then finally type:
cd C:\mingw
tar -xvzf SDL-devel-1.2.12-mingw32.tar.gz
Compiling SDL:
- Download the SDL source code
to a directory of your choice, for this example we'll use "C:\mingw\SDL".
- click start, then programs, locate MinGW, them msys, then click the msys icon.
- you should now see a linux like console. type:
cd /C/MinGW/SDL
tar -xvzf SDL-1.2.12.tar.gz
cd SDL-1.2.12
./configure --enable-stdio-redirect=no --enable-arts=no --enable-pulseaudio=no --enable-oss=no --enable-alsa=no
make
make install
After you are done installing you will want to install the extended SDL libraries that DigiBand uses. You can choose to
compile these if you wish, but you will want to at least install the binaries.
- Download SDL_ttf.
- Extract the zip file into your C:\mingw directory.
- Download SDL_image.
- Extract the zip file into your C:\mingw directory.
- Do a sanity check to make sure the files extracted to the right place. Navigate to C:\MinGW and make sure there is no directory
starting with SDL, if there is enter that directory and move the contents of that directory into C:\MinGW.
- Do another sanity check to make sure libraries were installed correctly. Navigate to C:\MinGW\lib and make sure there is not
a SDL directory. if there is, enter it, move all the files in it into C:\MinGW\lib and delete the SDL directory.
- Do one last sanity check to make sure includes were installed correctly. Navigate to C:\MinGW\include and make sure there is not
a SDL directory. if there is, enter it, move all the files in it into C:\MinGW\include and delete the SDL directory.
The idea here is that you the SDL lib and include directories to be merged into your MinGW lib and include directories. Once you have
made sure SDL is installed correctly you are ready to move on to the next step.
To play alot of the already existing songs for DigiBand, you will need XA decode. XA decode is a decoder written by a Japanese programmer
for an application called bandjam. It has long gone extinct, however DTXMania, Session stream, and DigiBand all require the use of XA Decode
so the developer released the XA decoder as a binary only library. This is why XA will not work for DigiBand under linux. We are however,
moving to deprecate this library with the use of OpenAL. The XA format was originally used because MP3 and wav had inconsistant overhead
and latency when playing back on demand. DigiBand loads a small portion of data (8K of data) from waves and mp3's at the start of the song,
preparing them for near instaneous playback ( less than 1/20 of a second.) Therefore we recommend when creating new songs for DigiBand,
to use wavs and MP3s.
- Download XA Decode.
- Extract it to C:\MinGW\.
- Download ffmpeg to C:\mingw. We supply this version, as it's
the only version we could get to compile under windows as of now. You may be able to get newer svn checkouts to compile, but it will be at your own risk.
- click start, navigate to programs, MinGW, MSYS, and click MSYS.
- type
cd /C/MinGW
tar -xvjf ffmpeg-0.4.9-p20051216.tar.bz2
cd ffmpeg-0.4.9-p20051216
./configure --enable-memalign-hack --prefix=/C/MinGW --enable-mingw32
make
make install
7. Download and installing OpenAL
- Download the OpenAL SDK
- Run the installer for openAL.
- Next you should see the welcome screen, click next.
- read the license then when click I accept, then next.
- Here you will want to changed where it installs OpenAL, click browse and select you MinGW directory. By default it should be C:\MinGW. Click next.
- Click install
- Wait for the installer to finish. You possibly will not want this installed, so click "No, I don't want help integration" then click next.
- Select "Yes, launch the OpenAL redist and finish. Click next.
- Click Finish.
- Navigate to your MinGW directory, most like C:\MinGW.
- Enter the libs directroy, then Win32 (unless you some how found a win64 compile of MinGW.. if you did inform me right away!).
- Highlight and copy the files in this directory then navigate to your MinGW directory again.
- Enter the lib directory, then past the files you copied.
This will only install the developement tools for OpenAL, you will need to download and install the runtime to actually be able to use
DigiBand after you have compiled it.
- Download the Open AL Runtime
- run the installer with defaults, You are now done installing OpenAL.
8. Compiling DigiBand
Now are you ready for the fun part? If everything has gone well up til here, this next step should be
blindlessly easy.
- Download the DigiBand source installer for windows
- Optional/Recommended. Download DigiBand X.X.X for Windows
- install both to the same location, probably best to the default locations.
- Navigate to C:\Program Files\Seijinohki Soft\DigiBand\source
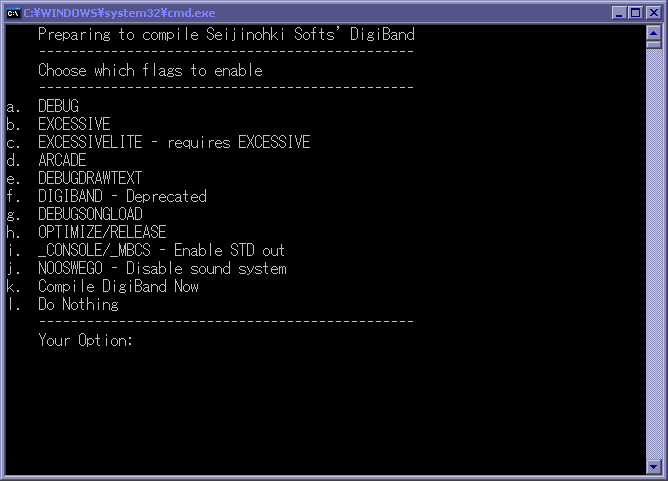
- double click "compile.bat", you should see:

- type k then enter to test the compiler.
- If everything goes well all you will see is:
Now Compiling...
Done
Press any key to continue . . .
- now navigate back one directory and you should see that your DigiBand.exe was overwritten with a nice freshly baked new one.
As you may have noticed in the previous section there is a list of flags that you can toggle when you
compile DigiBand for windows. simply typing the letter then enter will activate the flag. This list
will explain what each flag does.
- DEBUG - Tells DigiBand to display useful debug information such as error codes and timing codes.
- EXCESSIVE - Tells DigiBand to be a very mouthy program. This will cause DigiBand to announce everything
it is currently doing. Good for finding memory leaks or problematic code.
- EXCESSIVELITE - Tells excessive to tone it down a little. It will restrain a few events to allow DigiBand
to still be playable on higher end systems (requires a 4200+ or better processor).
- ARCADE - toggles a few bits of code for optimization in a arcade cabinent environment, as of right now this
is not really implemented.
- DEBUGDRAWTEXT - Prints very specific information about the DrawText subsystem for DigiBand.
- DIGIBAND - This used to be used for liboswego AL, but Velex has since merged the differences into one
library.
- DEBUGSONGLOAD - Prints specific information while a song is being loaded.
- OPTIMIZE/RELEASE - Compiles DigiBand with the optimization flags used in the official branded release.
- _CONSOLE/_MBCS - If you compiled SDL, you can use this to display the debug information in a console
window as it's happening live instead of stdout.txt.
- NOOSWEGO - Disables the Oswego AL sound system. This will disable any sound from DigiBand.
10. Understanding the DigiBand code tree structure
DigiBand was coded using C++ and C++ libraries, but I did not code it traditionally taking advantage
of some features from C++. Instead I optimized for speed by compiling it as one giant program.
The oswego AL library is coded as object oriented, but the base code and subsystems are in a
Hierarchy style of coding with the exception of a few classes having header files. So please
keep this in mine when editing DigiBand. Alot of variables are defined in globals.h, and alot of
functions are included in a very specific order in DigiBand.cpp.


